Weather and Misc

WEATHER: We’ve had some very nice, warm weather, then a few cold days with a lot of rain, then more very nice weather. For the next few days it will be cooler with the possibility of rain off and on, but not freezing. There is still that chance, of course. The average last frost date is around May 10, so hopefully we can do our major planting after that.

PLANTING PLANS: Our plans have been to prepare Tier 4 and three beds on the West side of the yard today, and start planting the things that like it cooler, such as asparagas, parsley, artichokes*, broccoli, kale, lettuce, spinach, calendula. Soon we’ll start peas, too, but need to build the trellis first.

SOIL: Since we didn’t start the sheet mulching in these areas, we will need to use a quick-start method, mentioned in “Lasagna Gardening”, of layering lots of peat along with other organic materials and plant directly in that. We have a lot of soil in piles that was removed from the yard in the leveling process, but are hesitant to mix it in due to weed seeds in it. The soil in the yard has already begun to sprout weeds, so we know they’re there!

Last week we found a listing on Craigslist for free “garden manure” which turned out to be well-aged goat manure, right here in Wellington. We’ve picked up two loads and may return for more. We also have a friend who has offered her alpaca manure. Neither of these need to be composted, and are supposed to be good for the garden. We will use that in addition to peat and the old hay we have. Much of the goat manure is compacted into sheets, so we’ll put those through the shredder–it comes out nice & fine.

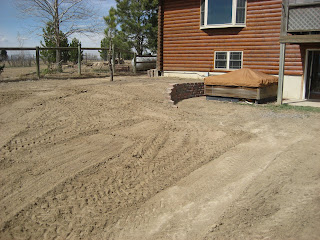
HOT TUB/PATIO: We’ve been talking about getting rid of the hot tub, and don’t even care about money. We just want someone else to do the work of hauling it. So, I placed an ad on Fort Collins’ “Freecycle” site on Thursday morning, offering it for free if anyone would pick it up. By the afternoon I’d received about 7 requests for it. I contacted the first person, who came to look at it that evening and plans to pick it up today. It’ll be nice to have it gone since we aren’t using it and it’s just in the way. Now we can fix up the patio there with a table & chairs.

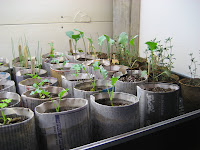
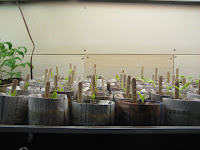
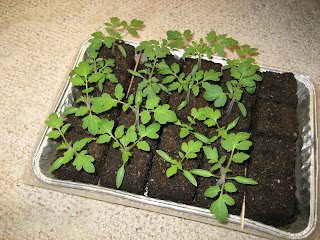
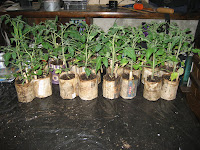
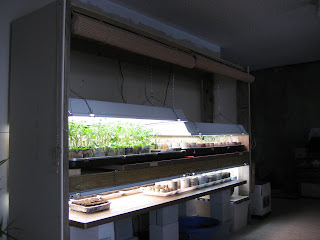
SEEDLINGS: The tomatoes are huge, since I transplanted them into the larger pots. They really like all that soil. I transplanted one of the endive plants into a larger pot, thinking it would get bigger and we just may eat it. Sure enough, it’s a LOT bigger than the ones still in the smaller pots. Too bad I just don’t have the space to transplant more things into bigger pots. I’m sure the peppers would like it. Too bad I can’t get those tomatoes outside yet! I really goofed, starting them so early. Other things are doing well, but sadly, the seeds I planted two weeks ago haven’t sprouted. Several different things: same result. I wonder if I did something wrong with the soil? The only other difference I can think of is that they’ve been under the lights the whole time, whereas last time I kept them warm at first and not so light, by laying them on top of the light fixtures. Maybe that’s the problem? I’m thinking that today I’ll go ahead and put new seeds in the same blocks and see if they sprout.

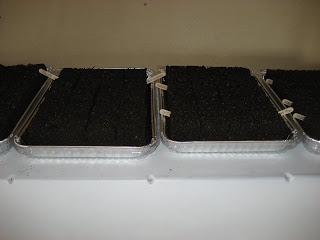
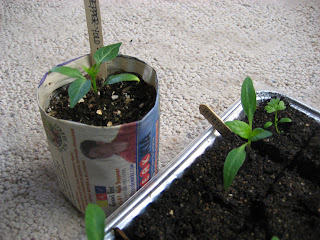
SOIL BLOCKER: I received my 4″ soil blocker to transplant the 2″ size into them. It took a while to get the process down to make them without falling apart when I eject them. But, a better job of packing the soil in with a stick, wetter soil mix, and very carefully lifting the blocker up straight all helped. I think I’ve got it down. It’s very fun to put the little guys right into the big boys. I’m only transplanting the best plants this time, and not so shy about throwing out the least healthy.

MORE SEEDS: I’ll be planting a few more seeds in small blockers, now that there’s more space under the lights from the things that are going out this weekend. A few things could use a 2-3 week head start under controlled conditions.

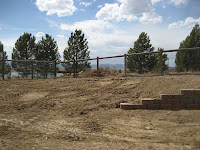
LAYOUT: I’ve revised the layout plan a bit for where things will be planted. We’ll be putting the corn/beans/squash (three sisters) on the NW corner, instead of the NE. There’s more room there, and the heighth of the corn won’t produce shade for anything else. Tim began to cut down the tree that was there, but left the trunk up until we decide whether we might use it for something like a bird house or scarecrow support. Don’t know yet, but we’ll probably just take it out.

Topsy Turveys and More Landscaping


I planted tomatoes in our Topsy Turvey Upside Down Tomato Planters yesterday and today. It’s been nice enough I can have them out for awhile during the day, then bring them in at night. I’m a bit challenged to find a place to hang them on bad weather days in a window where they can get some light, which are coming soon, but we’ll figure something out. I don’t want to drill any holes in the ceiling or walls or wreck anything for this interim arrangement. In about a month we should be able to leave them out all the time. I put two plants in each one (three varieties=three planters) because the instructions said I could. The one planted yesterday (left) has already begun to curl its stems and leaves upward. It should be fun to see them grow like this. It was a little tricky getting the tomatoes carefully into the planter, but I don’t think I damaged any stems. The planters took a LOT of potting soil, and I left more room at the top than was recommended. I’ll add more soil later if need be.


Tim finished back-filling the dirt behind the bricks and is almost done leveling out the rest of the area on the west side of the yard. After we take out the hot tub I think it will be very cute to have some flowers right there alongside the bricks, and a table and chairs on the patio (currently under the hot tub). In the corner we will begin amending the soil there for my asparagas plot where I will also plant some of the tomatoes, basil & parsley, which are supposed to benefit the asparagas. The asparagas are perennials, so I’ll let them grow big this year and leave them alone there in the corner to sprout next spring.

I never knew I’d be so excited to see worms, but when Tim was digging and leveling the soil, we saw worms pop up and it was a lovely sight. We wanted to know they found us and are working our soil under our sheet mulching project. Now we know they’re there!


The
“kids” came to check out what’s going on. Come veggie time, they’re probably going to want to come into the garden for sure!

Seedlings in Blocks – Future Plans

I must say, the seedlings started in the soil blocks (with the soil recipe found in the Burpee book) are doing MUCH better than the ones I started previously in store-bought soil starting mix! I will not go back to the previous method! The soil blocks are so handy (and cute) and the bottom-watering process is easy. I lift out my tray with holes in the bottom, pour water in the plastic tray underneath, then dunk the soil blocks in their holey tray back down into the water. I either spray the tops or drizzle a little extra water on top if the tops appear dry. These new tomatoes (started 3/20) are very cute, eh? The empty blocks are some seeds I planted in some of the blocks that didn’t germinate–I figured it would be worth a try to re-use them.


Peppers: Small pot seed planted 2/20. Soil blocker seed planted 3/20. The soil blocker plant is swiftly catching up with the one planted in the small pot!

I made some more soil blocks and started a few new seeds, some for things I hadn’t started yet (sage, summer savory), a few more tomatoes for a later season harvest, some more spinach (some of the ones I’d started never germinated–this way I’ll have a few more to harvest later on, some more endive and lettuce, and some sweet peas. At least I’m being smarter and not planting too many of any one thing all at once. Next year I’ll know better right from the start.

Soon we will need to get some soil ready to plant a few things that can go out previous to the frost date–then I’ll have more room under the lights inside to transplant other seedlings into larger pots.

Tim is working on the raised area on the west side of the yard. It had previously been held up by some old railroad ties that were in bad shape and leaning. He took out a raised bed that had been supported by large bricks, so he put these bricks alongside the new raised area and will fill that in with dirt (photos to come). He also began to take out a small pine tree that was there, then stopped limbing it so we can think about doing something clever with the tree trunk–put a birdhouse or feeder on top? String wires to it like a maypole and grow pole beans or something from it? Hmmm… Here is a “before” picture from last February, I’ll add some photos tomorrow of what it looks like now.

We plan to get rid of the hot tub that is currently set on a brick patio, and replace it with a nice table and chairs. In front of this I might plant some flowers and ground cover, and enjoy this cute little spot. Tim warns me that it will be hot there in summer and too buggy to enjoy, but I’m sure there will be some times that it will be nice. I envision enjoying coffee there in the mornings!

Clay

I know that the soil here is not good for growing, and that it is a very clay-like medium.  It’s been really noticeable this week after it snowed and melted.  It is so gross!  Mud and muck everywhere. I have shoes saved for the purpose of walking in this stuff, but I still can’t get used to all the mucky stuff that gets stuck to them.  It’s slippery, too.  And you can’t always tell it’s mud until you step in it and slip. The water doesn’t drain well.  It just stands on top of the clay before it mixes in.  We have (had) some wood chips on our walkway area, and they’ve already gotten mixed in with the mud and are seemingly useless.  Bleahhhhhh…..  I am not used to this.  I liked the soil (and mud) much better at my house at Lake Tahoe.  (It had its limitations too, but the mud wasn’t like this!)  OK, I’ve vented. 🙂


It drives home to me the point that we will have a lot to do to amend this soil and get it ready to plant.  I wish we’d started this project last summer or fall, and started our sheet mulching then or grown some green manures, etc.  Oh well, we’ll just have to make do the best we can.  Next year we’ll be ready to go in tip-top shape.

So Many Tomatoes

By now it’s no secret, I planted way too many tomato plants and started them way too early.  They are big enough to be planted outside, but I can’t put them out there for another month.  I decided to take drastic measures.


I decided I need to transplant them again into larger containers.  These will need to hold them until they go into the ground.  I’ve already used all the sour cream and cottage cheese containers I’d saved, so thought I’d try to buy some.  I didn’t want to spend a lot of money on them, but went out to look for some–up until now I haven’t noticed any cheapie plastic containers for sale, but wasn’t really looking.  I went to Home Depot and didn’t see any so I asked.  The guy I spoke to didn’t think they had any and asked how big.  I saw a cart with some plants on it which were in some of the nursery type containers I was looking for, pointed to it and said, “Something like that.”  He said those were dead plants they were going to throw out and perhaps I could have those containers for free.  He went and asked his manager, and sure enough, we got busy pulling the dead plants out
 of the containers and I came home with 26 recycled, free pots!  Way to go!


I transplanted several of my tomato plants, trying a couple of different things with different ones and keeping notes to know what I did.  If some do better than others, I may determine what works best.  I have plenty, so it’s okay if I mess up and kill a few.  From my reading, I’ve found that when I transplanted them the last time I should have buried them deeper, cutting off the seed leaves and burying them above that spot so they’d grow roots there.  It may be late, but I did that, and in some cases also cut off the next leaves up from the bottom, burying them to that point.  In some cases I pruned off the top as well, to get them to slow down and bush out more.

Tim fixed the shelves under the lights so these can have more room.  The tomatoes seem to be happy on their new shelf and in their new big pots.  

I also plan to get a couple more of the Topsy Turvy upside-down planters and plant a few in those. According to the directions I can put two plants in each. They can hang outside during the day as long as it’s nice, and I’ll have to bring them in at night for the time being.  I still have more plants I haven’t transplanted (see photo at left), so I’ll need to figure out what to do with all of them–keep them as-is and see if they make it?  I’m sure I’ll give a few away.  Unfortunately I don’t have any more large containers, so whoever gets them will need to do their own transplanting.

I wish I’d read and/or processed all of the things I’ve read BEFORE I made mistakes, but with lots of different references and in some cases conflicting information, it will continue to be a “live and learn” effort, complete with mistakes.  Next year I should know better.

More “Potting On”


In the past couple of weeks, we made a second shelf of grow lights for more seedlings and to make room for the larger size of pots for the seedlings I’ve transplanted.  I think I did about a hundred of these today!  
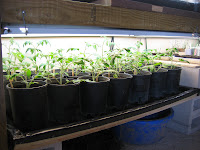
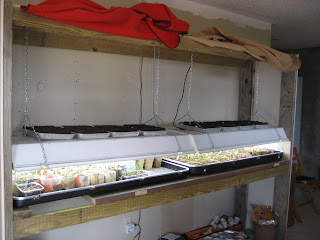
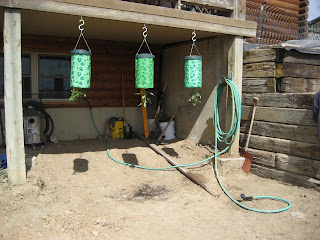
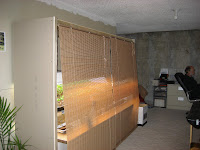
Tim also rigged up some shades to cover them at night to deter the cats from messing with them.  Quite a setup!


The tomato plants are doing very well, nearing a foot tall.  I know that I planted way too many, too soon.  Live and learn!  I wish I didn’t have to learn by making mistakes, but I guess that’s the best teacher, in some ways.  I’m sure we’ll give away some of the tomato seedlings.  I also planted some endive right at the beginning and they are doing well.  

At this rate, they may be full grown before I can put them outside.  The artichokes also seem to be doing well, as are 
the broccoli and kale and several herbs.

I’m concerned about the peppers.  
The leaves have turned yellow, and they aren’t growing very fast.  
Perhaps the rate of growth is normal, but I sure don’t like the yellow leaves.  Thinking they may have been overwatered, I’ve cut back on the watering and I think they’re doing better.  
Now that they are in their new, larger homes, perhaps they’ll do better.  I have plenty of them, so even if only a couple of plants in each variety make it, I’ll have some peppers.  I also started a new batch for later harvest, so it’ll be interesting to see how well they do and compare.


I’m still having lots of fun with this.  I updated my plan with clipart just for fun.  Really classy.  

Tim is helping me with a garden database in Access so I can track everything I do, plant progress, mistakes, and add notes of things I’ve read, etc.  I should have all my info in one place.  Maybe when we’re done with it we’ll sell it to other gardeners.

Soil Blocking

I made a few more blocks today–very fun. We haven’t built more grow lights yet, and the ones we have are pretty full, so I was wondering what to do with these newly planted seeds until we make the new grow lights. They don’t really need light until they germinate, but I need to keep them away from the cats. Aha! I put them on TOP of the current grow lights. They should benefit from the warmth of the lights, too. The trays of soil blocks look like brownies at first glance! Soon there will be little plants coming out of the top–basil brownies perhaps?


At night we’ve been covering the seedling area with the blankets tacked on top, to keep the cats out overnight, and that’s been working. The next shelf for our grow bench here will be underneath the current one, so we’ll have to create some way to keep the cats out….some sort of screen or something.


It seems like the costs keep adding up: we need this, we need that… So this first year will definitely be our “investment” year. After the initial costs, each year in the future we’ll be able to count our savings by growing our own food.

I ordered the 4″ blocker today. I got a call later to tell me it’s backordered until May 1. Dang! So I ordered it from another company and hopefully their’s aren’t backordered. I haven’t heard yet.

It sure is tempting to over-plant the seeds. I’m getting smarter and not planting so many all at once like I did with the first batch of tomatoes. I’m sure I’ll be giving away some of those seedlings, if they live. I’m a little concerned–they are looking sickly since I transplanted them. Hopefully they’ll perk up.

My First Soil Blocks!


I made my first soil blocks today! Here’s photos of my first row, and then 4 trays almost done. There are a few recipes around for the soil to use to make the blocks; I used one from my Burpee book that seemed easy. I was glad that I’d seen another one that suggested to screen the compost & peat to 1/4″, because I did that, and I think it helped. I got quite a few of the larger chunks out that way. I had done some reading and found that it will be good to water them from the bottom, but that it’s important not to let them get to soggy by draining off the excess. I was planning ahead and wondering how to do that, and thought I’d need a smaller size tray that I could lift when full of dirt. I got to thinking I could use the aluminum trays they make for cakes & lasagnas. While I was searching at the store for just the right size, I saw some with holes on the bottom that were designed to grill vegetables on an outdoor grill. I got to thinking that with the holes, I

could easily lift out the pan to drain them after they’ve soaked a bit. These pans were more expensive, and I couldn’t find another one just the right size to lay them in while soaking. Then I noticed that there were cake pans with plastic lids, and a set of two pans with two lids were cheaper than the set of two of the pans with no lids. So, I thought I’d drill the holes myself, as you can see. I’ll set the pan inside the lid to water, then lift it out of the plastic lid before it
gets too soggy. The pans easily hold 20 cubes, maybe 24 if I squeeze really tight, but I haven’t tried that yet.

It was fun to make the blocks! The recipes suggested adding enough water to make them mud pie consistency. It wasn’t quite my idea of mud pies, but they seem to be holding together. I jammed the block maker into the stuff 2-3 times “charging the blocker”, then packed it in as tight as I could with my hands until there was some water seeping out before ejecting the blocks. I started 4 pans of 20 cubes today, and plan to do more tomorrow and next week. I’m at about 7 weeks to our last average frost date, and many of the seeds suggest 6-8 weeks before (those I planted today) or 6 weeks before the last frost. My challenge will be where to put them all until they go outside, so I’m being more conservative as to how many of each thing I start. For some plants I’ll start a few indoors, and save more seeds to be seeded directly outside to stagger the harvest. We plan to create another grow light bench this weekend, but it will still be tight!

I like the soil blocker idea! Now I’m sorry I started so many seedlings without it, but it was backordered from England, and I just received it. Next year I’ll be able to do them all with the blockers, if I still like this program through the entire process. Already I’m thinking that the 4″ blocker with the 2″ indentation would be a good idea for these seedlings when they need more space.

Tim got parts for the tractor, fixed it, and is at it again digging. Now he’s creating a drainage & walking path in the low spot, the center of our yard. The water will go out to pasture from there, if we get a big rain storm. We’re leaving some sloped areas for things that would appreciate the drainage, like strawberries, squash & melons. Tim has one more terraced area to shore up, then we’ll do some more lasagna beds to prepare for planting even though it’s getting a bit late in the season. We’ll just have to amend them if they aren’t “cooked” in time.

“Potting On”


Today I did my first “potting on”, or transferring the little seedlings into larger pots.  I made some larger pots out of newspaper, and put the little guys into the bigger pots.  It was easy enough, but I’m thinking that next year I may consider the potting blocker method all the way–from start to finish.  The larger size newspaper pots aren’t holding together as well as I’d hoped, and I’ll have to be careful with them.  I don’t want to use plastic pots–I think that transplanting will go much more smoothly in the newspaper pots as I can put them in the ground with the newspaper still intact.  


I received my  4 x 2″ size soil blocker this weekend, and plan to start some new seedlings in the next couple of days.  This will make small blocks (without sides) to start the seedlings in.  If, in the future, I should buy the 4″ size potting block maker, I will be able to easily put the 2″ size directly into the larger one in a 2″ hole that it will make.  It sounds a lot easier than what I did today, but it would be an investment to buy the block maker.  I’ll see how it goes.

I’m realizing that I started way too many seeds all at once.  Too many tomatoes and too many peppers for sure.  I should have started with just a few and then started more a month or so later. I’m sure we’ll have way too many tomatoes & peppers all at once, but we’ll live and learn!  Maybe I’ll be able to give some of the seedlings away to someone else to plant in their garden.

Rabbits

Our plan has been to have a path around the entire perimeter of our garden for Lucky (the dog) to run, so she can continue to bark at the bunnies to keep them away!  


We were concerned that she would mess up our sheet mulching process, so we had Lucky confined to the front yard until we could fence it off.  The next day we looked out and saw that the bunnies have discovered that Lucky was gone, and already about 10 of them were having a party in the backyard, trying to find new goodies.  There is nothing there for them yet, but it was really something to see them converge in that area!  We let Lucky out back, and as soon as they smelled her, they scattered!  It was pretty funny. 

We’re glad we have planned to keep Lucky’s pathway!  She will definitely help to keep the bunnies away.  Hopefully the additional electric fence we plan to put up will keep them out when she is in the house at night!  

In the meantime, Tim put up a temporary fence around our sheet mulching project to keep Lucky out of that.  Now she’s happily back in her backyard, and the bunnies are on the other side of the fence being barked at. (The current fence is unfortunately not “bunny proof”.)