After viewing the Back To Eden film, we decided to use this approach on all our garden beds. We’ve found a few places to attain free wood mulch, and covered all of our beds with 3-4 inches of wood mulch. Our results were both good, bad and indifferent, as follows, and I will outline some of my questions/answers and my plan for 2014.
GOOD!
We watered much less. Most areas were watered about once a week. We watered each area for about 8 hours with an oscillating type overhead sprinkler. (In previous years we used soaker hoses on timers, and watered every 2-3 days. We found this effective, but after many repairs to broken/split soaker hoses and a lot of work setting up the systems, we thought we’d try something different.) This new system seemed to work quite well. I frequently checked the soil under the mulch, and it stayed quite moist.
Fewer weeds in the beds. Yahoo! We still had a lot of the bindweed coming up through the mulch, but that was about it, and they were quite easy to pull. I don’t think there’s any way to get rid of that stuff.
It looked nice. Ok, aesthetics are a nice touch.
BAD!
And boy was this a headache. We had millions of SOWBUGS or PILLBUGS, ROLY-POLYS or whatever. The wood mulch atop the soil made a perfect environment for them to eat and reproduce. In the past, my research had indicated that sowbugs are not generally a problem to the vegetable garden, because they eat decayed matter, NOT the plants themselves. However, with a sowbug explosion, such as what I experienced, there can be too many sowbugs for the food available, and they will eat seedlings, particularly beans. It is possible that the addition of a large amount of un-decomposed wood mulch created a great habitat for the sowbugs to reproduce, but because the mulch was fresh, it wasn’t good food for them. They can only digest decayed matter or young, small seedlings, so that’s what they ate. That’s my theory.
I lost many of my beans and peas. In many cases, they would sprout, only to be eaten very soon. One new variety I had planted, and was anxiously awaiting the sprouts to appear, only to find a couple of sprouts. I dug around, looking for the seeds in the ground, and the seeds were gone! The only bugs present were the sowbugs, and they were everywhere. A whole row of carrot seeds never sprouted–I’m not sure if it was because of sowbugs or something else. I was successful with carrots in another part of the garden where I didn’t see as many sowbugs. The seedlings of all the other things I started indoors in soil blocks and transplanted to the garden were unaffected. (Whew!) Next year I just may sprout my beans and peas indoors also. It will be extra effort, but may make the difference between growing beans and not.
Another problem with the sowbugs is that I found them eating my ripe tomatoes, particularly the Burbank variety, which was quite short, with tomatoes closer to the ground. I would find tomatoes with holes in them and sowbugs inside. These buggers even climbed up the vines to reach the tomatoes–they did not remain in their soil habitat. I’ve read that the sowbugs may only take advantage of holes in the tomatoes left by other bugs, but I’m not sure. There had been some grasshoppers hopping around, and they may have opened a hole for the sowbugs; I just wasn’t watching 🙂 At one point, I thought that leaving the damaged tomatoes on the ground for the sowbugs to finish eating might act as a trap keep them off the good tomatoes on the plant, but that didn’t seem to help. There were just too many of the buggers.
After I began to discover the problem, my research indicated that two organic products can be helpful: diatomaceous earth, and Sluggo Plus. Unfortunately, for my garden it was too little, too late. I got these bugs under control somewhat, but not enough. Most sources recommend removing all mulch to avoid the sowbug problem, but I am unwilling to do that. I am determined to lick this problem in 2014. My plan of attack is listed below.
INDIFFERENT
Another minor problem with the mulching was the presence of a few fungi. The ones I found and identified were considered harmless; a variety of mushrooms, bird nest fungi, and something else I never identified.
QUESTIONS
There are some questions regarding deep mulching I’ve found few answers for.
Q. How do add compost and/or manure to the garden? Is it necessary? (I continually make compost and we have plenty of horse manure to use up.)
A. Some sources suggest compost and/or manure are not needed with deep mulching. Some suggest mixing it in, others suggest sprinkling it on top and let the nutrients trickle down. Apparently adding manure will help the wood mulch decompose more quickly and add more nitrogen to the soil, which is being used up by the wood mulch.
Q. What do I do in the fall, to clean up and prepare for the next spring season?
A. Some say pull out the dead plants and do nothing but add more mulch if needed. For the most part, I have not found answers to this question.
Q. Does wood mulch make the soil too acidic?
A. Some sources would say yes, other suggest it isn’t a problem. My best guess is that because our Colorado soil is generally quite alkaline, it won’t be a problem. I’m not sure about the highly amended soil in our raised beds, and my pH tester doesn’t seem to work all that well, but I’m not going to worry about it.
PREPARATION FOR 2014
FALL CLEANUP/PREP:
Here’s what I did, based on my best guess after research. After removing all garden debris and weeds from the beds, I raked back the wood mulch, then loosened the soil a bit with a hula hoe, which removed as many remaining weeds as possible. I added about an inch of aged horse manure and blended it in with the hula hoe. (Some of the 2013 wood mulch was also blended in during this process.) I sprinkled on some diatomaceous earth (DE) to kill off any remaining sowbugs before they overwinter in the soil. I raked back the wood mulch, then sprinkled more aged manure on top. Then we topped the beds with a couple of inches of fresh wood mulch. I’m hoping that the addition of manure will offset the problem of nitrogen being taken from the soil due to the wood mulch. I am hopeful that the deep freeze we have experienced in the past week (down to -18 one morning, and other sub-zero temps for several days) will have killed off some of the overwintering bugs.
SPRING PREP:
To proactively control the sowbugs, I plan to rake back the wood mulch when there will be a week or so of dry weather* and sprinkle on some DE and Sluggo Plus, then replace the wood mulch, all before planting. I want to kill off as many sowbugs as possible before planting. I may also add some organic fertilizer (HOF) during this process.
*Both of these products become ineffective when wet. That is a big problem with them!
All in all, I think that the deep mulching system has been a positive change, and will create better soil for future years. I am currently reading Ruth Stout’s “No-Work Garden Book” to learn more about mulching in the garden. We will continue deep mulching!
Tomatoes 2013
TOMATOES are always my most prized garden treat. This year I tried some new varieties and some old ones, and had mixed results. I’ll outline my thoughts on each. I ended up with nine different varieties.
One experiment: I’ve always rotated my tomato beds, and have not planted tomatoes in any bed that had tomatoes, peppers or potatoes in the previous year, or preferably two years. Last year I’d planted my indeterminate tomatoes in a row in the NE corner, and it was such a nice spot, I thought I’d try putting the indeterminates in the same bed this year. Not a good idea. They did not do well. Live and learn! Sometimes ya gotta just trust what “they” say.
Overall thoughts: The weather was funny this year, and results were mixed. Some plants did well, others did not. Some succumbed to sowbugs. (See more information here.) Some were new varieties that just didn’t do well. Perhaps I should become more familiar with tomato diseases. Perhaps I am dealing with things that would be prevented if I knew what was happening. As it is, I just plant plenty of tomatoes and remove the plants that die. I do not compost them: I take them to the dumpster, so they won’t infect the rest of the garden.
SILVERY FIR TREE I had these seeds left from last year, and planted two early in the greenhouse, after starting them in the house under lights. My plan was to have these as the earliest tomatoes, before the outside ones ripened. I did get several small early tomatoes from these plants, but not really much earlier than the outside main garden plants. If I do early tomatoes in the greenhouse next year, I’ll try another variety.
CHEROKEE PURPLE I planted two of these in the experiment indeterminate row mentioned above. One survived but I did not get more that 5 or 6 tomatoes.
FH CROW These were free seeds sent to me along with my Sand Hill Preservation seed order. I planted one in the greenhouse and one in the experiment indeterminate row mentioned above. I got a few tomatoes from the greenhouse, but the garden bed plant died early on.
GERMAN GIANT I loved these last year, and planted two in the experiment indeterminate row mentioned above. One plant survived but only produced 3-4 edible tomatoes.
CAMP JOY This is a large sized cherry tomato. I planted one in the experiment indeterminate row, which survived, but I did not get an abundance of tomatoes. Those I did harvest were good and sweet, although more mealy than I’d expect for a cherry. I started another mid-June in the house, which was transplanted to the greenhouse 7/25. It did well. My plan was to have one tomato which would continue to produce after all others froze. GOOD PLAN! We had fresh tomatoes for salads throughout the fall. I picked all remaining ripe and slightly ripe tomatoes before the big freeze last week and they will last at least a couple more weeks in the fridge, I am sure.
RIO GRANDE I planted 8 of these, my favorite paste tomato for canning as diced tomatoes. These are large, easy to peel, seed and dice. A couple of these died, which always seems to happen. The remaining were my latest tomatoes to ripen, but were as good as usual, and many jars of diced tomatoes and various tomato sauces were canned.
HEIDI These were disappointing. I bought the seeds based on the descriptions, “A prolific tomato from Africa that bears 2-1/2-inch, 3-4 oz, pear-shaped, bright-red fruit with rich tomato flavor. Thick walls with tender skin, very meaty and great for sauce. A long season, super paste or canner or good eaten raw in the garden.” And, “although classified as a paste-type tomato, it does not seem to have a problem with blossom end rot and is “remarkably tolerant of all foliage diseases in a zone 5 garden.” They were supposed to grow well in hot, dry climates. Sounds great. There weren’t very many of these, and those that grew were small. Many seemed diseased and were not kept. Some plants produced round tomatoes, others were oblong or pear-shaped. Perhaps the seeds were cross-bred?
BURBANK This was my first year planting these and they were a winner. They grew on short, sprawling plants that were difficult to stake up, but the tomatoes were plentiful, delicious, red and round. Unfortunately, many of these were eaten by the dreaded sowbugs and/or maybe grasshoppers. Some sources indicate that the sowbugs don’t eat the tomatoes unless a hole is started by some other bug, so perhaps the grasshoppers and sowbugs worked together on this. See more about the sowbugs here. I will grow the Burbanks again.
PRINCIPE BORGHESE This was the 3rd or 4th year I’ve grown these. Two plants were huge and prolific, the healthiest of all the tomatoes this year. This is supposed to be “semi-determinate” but one of them grew like crazy, much more like a determinate. Unfortunately I hadn’t been pruning it like I would an indeterminate, and it got a bit out of hand.
NEW TOMATO SUPPORTS – I should have taken a photo of the tomato supports Tim built. Sorry. They are cheaply made of electrical conduit, easy to put up, take down and store. Some are taller, others shorter. They have worked well this year and last. Next year I’ll plan to include a photo!
Squash 2013
I enjoy squash, particularly a good, winter squash. In fact, maybe I’ll cook some tonight for supper! But, in the past years I’ve had mixed results in the squash beds, and quite a challenge controlling SQUASH BUGS and CUCUMBER BEETLES.
 |
| Lakota Squash |
This year I planted 8 varieties of squash: 2 summer squash (1 yellow and 1 green zucchini), 2 each of these winter squash: Winter Sweet REBA Acorn (bush variety), Burgess Buttercup, Sweet Meat, Long Pie Pumpkin, Nutterbutter Butternut, and Lakota. Of all these, I harvested only 2 Nutterbutter, 2 Lakota, and 3 Long Pie pumpkin, along with a small few of the zucchinis.
The demise of my squash is a mystery to me. I saw very few of either the squash bugs or cucumber beetles. I tried very hard to prevent the appearance of these bugs and I was successful. I proactively sprayed the plants and soil around them with neem, pepper/garlic spray, sprays made with boiled rhubarb leaves and none of these should have caused the death of the squash plants. The newest organic pesticide I tried was SurroundWP. I believe this helped a good deal. Its effective ingredient is kaolin clay, a white powdery substance which is mixed with water and sprayed onto the plant leaves. Apparently the bugs don’t like it and avoid the sprayed leaves. The Surround also helps protect the plants from UV rays. It looks kind of funny, seeing the white spotty leaves, but I think this was quite effective, and I don’t believe it was the reason so many of the plants died. I’ve also read that mint and lemon balm can repel those bugs. Rather than plant these invasive perennials near the squash, I’ve planted them in other areas of the garden (where I don’t care if they invade) and some mint in a large pot; I cut off the leaves and sprinkle them around the squash. Unfortunately, I’ve done so many things to prevent the bugs, I can’t say what does and doesn’t work. I wanted so badly to attack these bugs I went ahead and threw everything I could at them.
So the early death of the squash wasn’t due to bugs. All plants were doing quite well until the end of July, when they all started keeling over, one by one. One day they’d be fine, the next they’d look a bit wilted, the next they were pretty much dead. The plants all had immature squash growing on them. I tried pruning off the deadest parts to salvage the remainder of the plant, but that didn’t help. I just don’t know why this happened. Could it have had something to do with the wood mulch? (I don’t think so.) I did not see an abundance of sowbugs in these beds as I did the others, and don’t believe these were a problem to the squash. The two summer squash plants never really took off as usual; they did survive a little longer than the winter squash, but they succumbed as well.
All I can say is that some of my neighbors experienced the same symptoms with their squash, so I’m not alone. Maybe it was the weather. I was so hopeful to try the new, unique varieties such as Sweet Meat, but I’ll have to try again next year. I was grateful for the two big Lakota squash. So far, I have cooked one and it was absolutely delicious!
Potatoes 2013
Last year, the 2012 garden, I had followed some advice that it would be good to store the potatoes in the ground, under mulch, and that they would be fine until spring. So, in the fall I threw extra mulch (mostly hay and manure) over them and let them be. I dug some up in December and they were good. Then, I went out to dig more up in February, only to find that most of them had frozen. Some were no good at all, and some were ok, but tasted a bit sweet and had an odd texture. I cooked them all, mashed them, and froze them for future use. Gee…I’ve still got some in the freezer that need to be eaten! 🙂
This year, 2013, I did leave them in the ground as long as possible. However, last week when the weather forecast was calling for sub-zero temperatures, I went out on a crazy windy day, prior to the storm, and dug up the remaining potatoes. I think this was a good plan–storage in the ground as long as possible was better than storing in the refrigerator, and now that they are safely in the refrigerator, that is better than risking them freezing in the ground.
The Rio Grande Russets I planted were small, but good. The Yukon Golds were bigger and best.
Cottonwood, Juglone and Tomatoes
A couple of years ago I’d planted a row of tomatoes under our cottonwood tree, and they did not do well at all. Many died, those that lived produced very few tomatoes. I blamed it on the variety I had chosen, and have not planted those since. Then I realized that the strawberries I’d planted near that tree have never done well. I’ve replanted the same area with strawberries for 3 years, and just couldn’t get them to grow. I got to wondering if maybe the cottonwood had something to do with these problems. I did some research, and the answer is YES!
Cottonwood trees, like the Black Walnut, produce the chemical, juglone. Juglone is very toxic to some vegetables and fruits including: tomato, pepper, potato, eggplant, blackberry, blueberry, apple. These plants will yellow, wilt and die. I didn’t see anything about strawberries not growing there, but in my experience, they didn’t. There are also several ornamental plants that won’t grow near them, but I don’t do those. Vegetables that are tolerant to juglone include: beans, corn, melons, squash, beets, onions, parsnips, carrots.
I will no longer be planting tomatoes, peppers or potatoes or strawberries near these trees. I also try to remove all leaves and twigs that fall onto the beds. Apparently it’s ok to compost the leaves and twigs, but they should not be left on fresh. It is best to add additional organic matter/compost to these beds, which will lessen the effect of the juglone.
This year I planted several perennial herbs in the area which had been my strawberry bed. They’ll just sit there and I won’t worry about what to plant there in the future. These did quite fine. One of the things I planted directly under the tree was mint. I know that mint is quite invasive, and I thought that if it would grow there, it would be just fine! I’ve read that mint leaves are good to repel squash bugs, so rather than planting the invasive mint among the squash, I will let it grow by the cottonwood if it can, then cut the leaves and scatter them around the squash. The mint grew there quite well, along with some chives, lemon balm, marjoram, lovage, thyme and salad burnet. In the spring I will discover what survived the winter.
For more information, read these articles:
http://pubs.ext.vt.edu/430/430-021/430-021.html
http://www.buzzle.com/articles/tree-roots-effects-on-soil.html
http://hort.uwex.edu/articles/black-walnut-toxicity
http://davesgarden.com/guides/articles/view/1186/
2013 PLANS
OK, so I’ve pretty well neglected writing on this blog. But, if anyone is listening, I’ve just posted my garden plan for 2013 on growveg.com.
The main garden can be seen here: MAIN GARDEN
The three sisters plot is here: CORN-BEANS-SQUASH
Right now it’s pretty brown and ugly outside. I’ve been working hard inside on plans and getting my new tracking system ready using Microsoft One Note–something I’ve never played around with before; so far it’s pretty handy. This year I am planning to do some of the most successful varieties from past years, and a few new things to try for fun.
The strawberry bed we’ve had near our cottonwood tree has never done well. After a suggestion and some research, I’ve discovered that cottonwoods put off juglone, a chemical that inhibits the growth of many plants. I’ll be removing the strawberries from that bed (if they’ve survived) and will plant several perennial herbs there that are supposed to be tolerant of juglone. Another bed near that tree has also had some sickly plants (especially the tomatoes, a couple of years ago). I’ve found that beets, beans, squash, onions, parsnips and carrots are supposed to do ok there, and will limit those beds to those items from now on. I’m still learning!
The greenhouse has done well this winter, and has provided us with enough greens for salads all winter. I’ve got some onions overwintering in there, too, and hopefully they will provide an early round of onions in the early summer. I will also be planting a couple of early tomatoes in the greenhouse, to get a head start on them for the season.
Duck Update: We still have the ducks (3 welsh harlequin, 2 pekin) and are enjoying four eggs a day at this point. It took them a long time to begin laying after their molt (the pekins began laying in October, the harlequins not until February). Every day we hope to find a fifth egg. Maybe tomorrow!

2012 GARDEN IS COMPLETE
The 2012 garden is planted–see maps below. Whew! Everything is in its place and I’m on to less urgent maintenance projects, like weeding and catching up on the blog. We’ve been working hard, and it’s nice to have a break.
NEW THINGS 2012:
- We’ve completed framing all of the beds! The raised beds without frames worked well enough, but the framed ones are so much better at keeping the weeds out, and with the sloping edges of non-framed beds there was less planting space. With the frames I can plant much closer to the beds. Also, we think that the frames should keep the ducks out of the plants should we let them into the garden to snatch bugs.
- I’m trying some Minnesota Midget melons. I’ve tried some melons before without success, but these are smaller, with a shorter growing season, so I’m giving them a go.
- We created a new “Three Sisters” patch of corn, beans and squash. We’ve done the 3 sisters before, but this year we put a new 15’x25′ bed off to the side, near the ducks. To keep ducks and bunnies out, we framed it and added a couple feet of snowfence around the perimeter. See photo below. I’ve planted 3 varieties of corn to mature early, mid and late season. All are organic, non-gmo, non-hybrid corn.
- I’ve sprayed with beneficial nematodes to hopefully limit the bugs which grow in the soil. I hope this helps, particularly with the cucumber beetles I had so much difficulty with last year.
- I’ve done a much better job of mulching everything right from the start. I’m using some chopped up moldy hay we’ve had sitting around, mixing it with some dry manure. It seems to be working well, except that the manure is full of weed seeds. I figure I’ll just deal with weeding that first batch of weeds that pop up to get the benefit of the manure in the garden.
- The tomatoes are spread out a little more this year. Instead of doing double rows of tomatoes in the beds, they’re all in single rows, mingled throughout the garden and planted with tomato companions: basil, carrots, onions, marigolds, thyme. I’m using a variety of trellising methods, as I haven’t decided on a favorite. There are pros and cons to all the methods I’ve tried so far.
- The greenhouse worked well and was used for getting plants ready for transplant in addition to winter edibles. We had fresh greens for salads just about all winter. Some seedlings were planted in the greenhouse beds until ready for transplant, others were just put into the GH during their “hardening off” time. I also planted just a few (4) tomatoes in the greenhouse to get off to an early start. The tomatoes on those plants are green and growing at this point. We’re looking forward to fresh tomatoes soon! The last couple of months it got pretty hot in there some days, so to add additional ventilation and cooling we installed an old swamp cooler Tim had previously used for the house. We put it on a thermostat and were able to keep the greenhouse from reaching the mid-90’s down to 80 or lower. It was very helpful! We’ve now removed the polytarp cover on the greenhouse, and it is open air for the summer.
- I fixed up a small area with a few perennial flowers. It’s a hot spot against the wall on the south side of the house, and not good for most veggies. Hopefully the flowers will survive.
Many other things I’ve done in the garden pretty much the same as before: lots of tomatoes, peppers, onions, garlic, beets, rutabagas, potatoes, beans, summer and winter squash, peas, carrots, greens, herbs, strawberries. The asparagus has been good, and I’ve frozen what we haven’t eaten, but now it’s time to let it grow out. I’ve also planted LOTS of marigolds all around the garden–they’re supposed to keep a lot of the bad bugs away, and they’re cute.
The ducks are doing well and have produced lots of eggs for us. They went through a period of about a month when they weren’t laying as consistently, but now they’re back on track with 4 eggs almost daily. Occasionally I sell a dozen or give a few away to friends who’ve never tried them. They’ve been fun, and enjoy hanging around us when we’re working in the garden–especially near the 3 Sisters, which is in their territory. Pink is the mellowest duck and will let me pet her when I feed them. Orange is the loudest, crankiest, and often seems to have her feathers ruffled. Blue and green are both fairly mellow, too.
Here are my final garden maps for the season: If you wish to see these maps in more detail, click HERE and HERE.
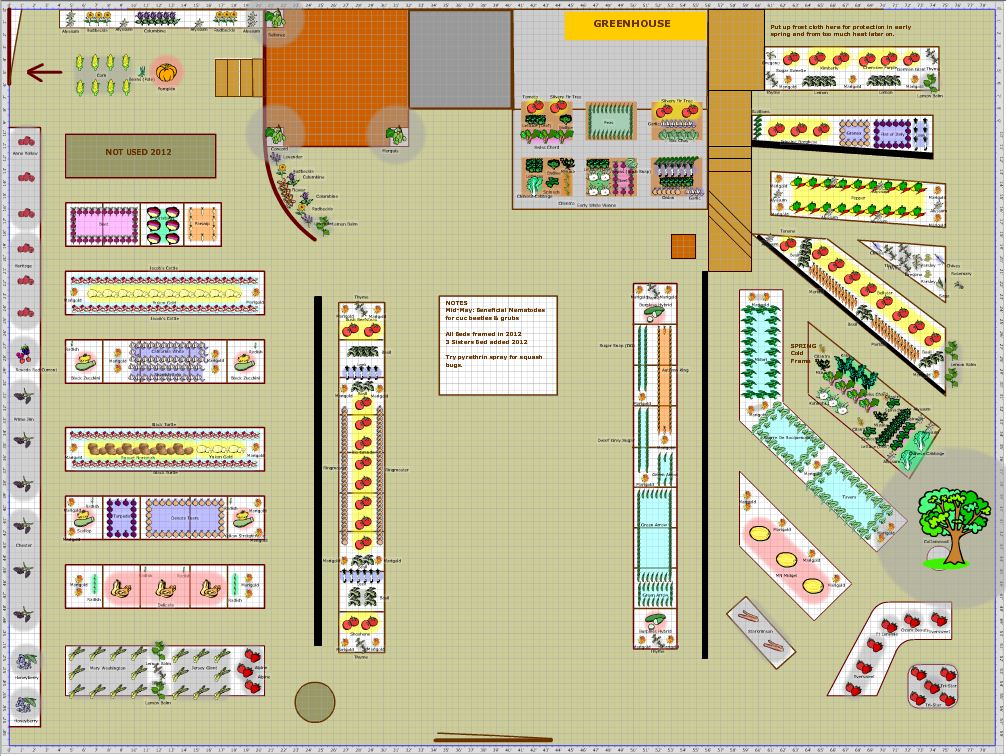 |
| Main Garden 2012 |
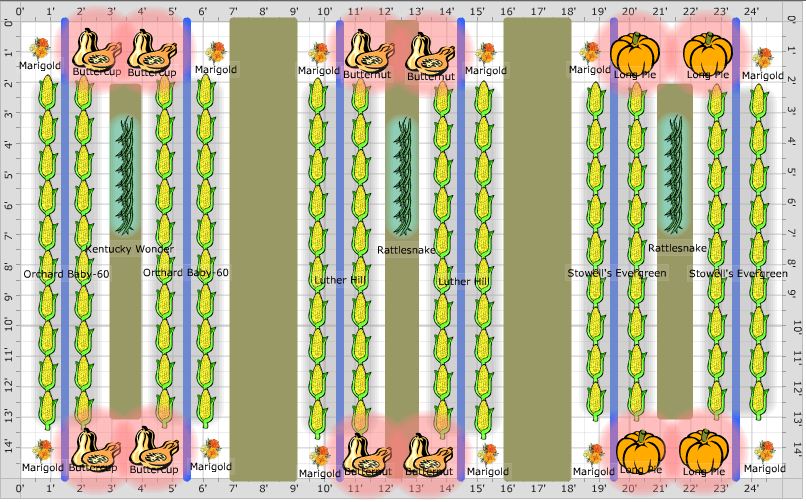 |
| 3 Sisters Patch |

2012 Garden Plan
I’ve mentioned previously this cool tool at growveg.com to create a garden plan. My current plan is now published and can be seen here: 2012 Garden Plan I’ve also placed a link in the sidebar at the right. This only shows the main garden area. It will look something like this:

We’re also preparing a patch to the west for “three sisters”: corn, beans and squash.
I’ve been busy studying garden catalogs and websites to find my seeds for the 2012 garden. Seeds are ordered, and mostly in! I’ve already started a few things indoors, under lights. Some will go into the greenhouse for an early start: mostly greens, and a couple of tomatoes. The greenhouse is a new adventure, so everything I do there now is an experiment.
The greenhouse is holding strong, even with all the gale-force winds. And the plants are doing well, I guess. (I don’t really know what to expect.) We still have a little lettuce left from what was planted in the fall, although it’s been attacked a bit by aphids. Other than that, we’ve had some nice, fresh kale, spinach and swiss chard. The beets, kohlrabi and rutabagas have yet to form bulbs, but they have some nice foliage. The peas have blossoms and one of the napa cabbage has been eaten–the other is ready to pull. Next fall I’ll do things a bit differently, but this was a good start. Some days it’s 80 degrees in there, the mornings are very rarely below freezing, but since everything in there can handle it, the plants bounce back after it warms up.
The ducks are still producing 4 eggs almost every day. If anyone would like to purchase some, they’re $4/doz.
Greenhouse!
 |
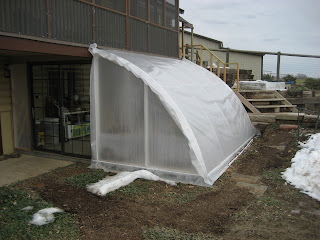
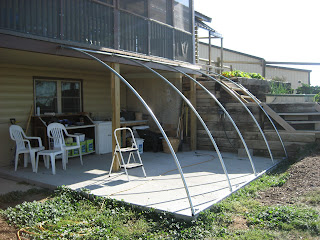
| Greenhouse, It faces south. |
The greenhouse is done! We finally have it all completed and planted, and are excited to see how well things will grow.
First, Tim put the hoops up, and side supports. We got some “woven poly” from Northern Greenhouse Supply, along with their poly-fastener, which worked quite well to stretch the poly across the hoops. These are great products, and Bob was very helpful answering questions. We received our order quickly, too.
 |
| Nice sliding door |
After stretching the poly over the south side, we put some poly on the curved part of the side wall, still not sure what we would do for a door and the side by the wall of the house. We managed to get a free, double-paned sliding door, which worked out perfectly. It also has a screen door which we will add to it when we need the ventilation. We still need to put in some vents on the far wall, but will do that in time. Right now we don’t really think we need it. Soon we’ll also be setting up a fan, just to get the air moving a bit. We’ll probably run it each day for awhile.
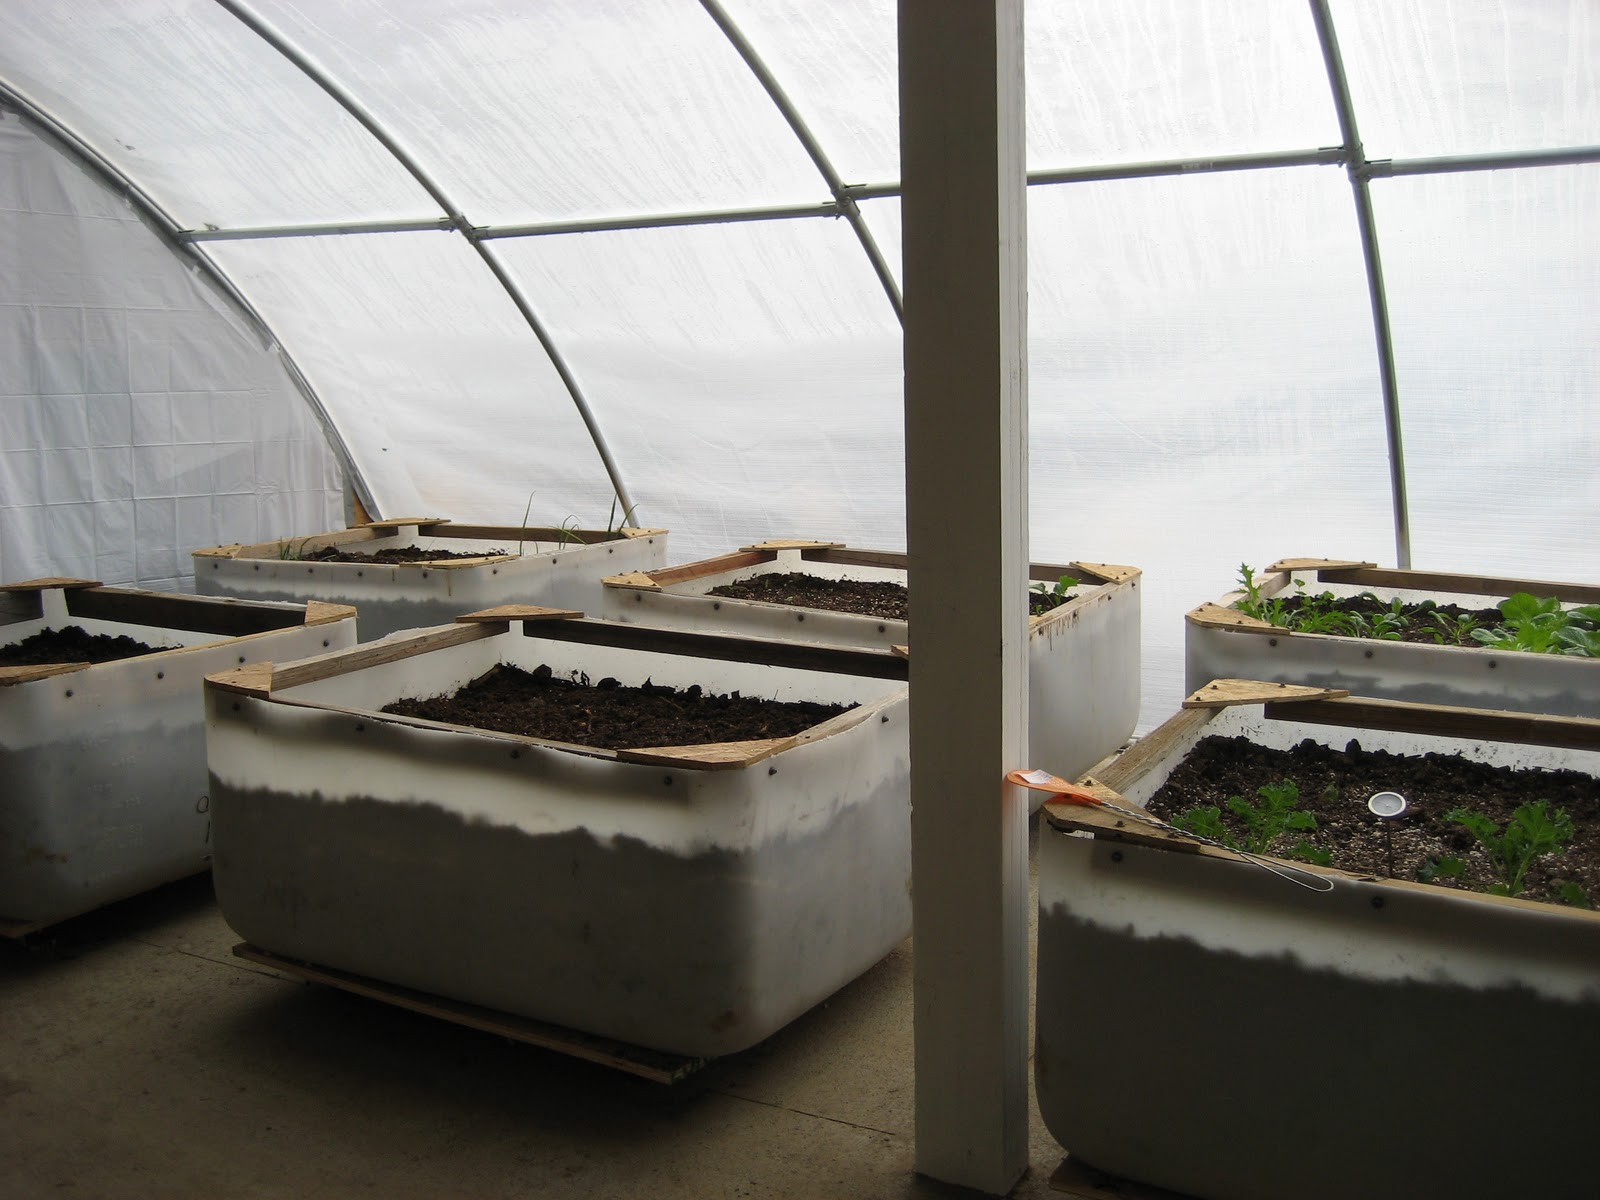 |
| 6 bins for planting |
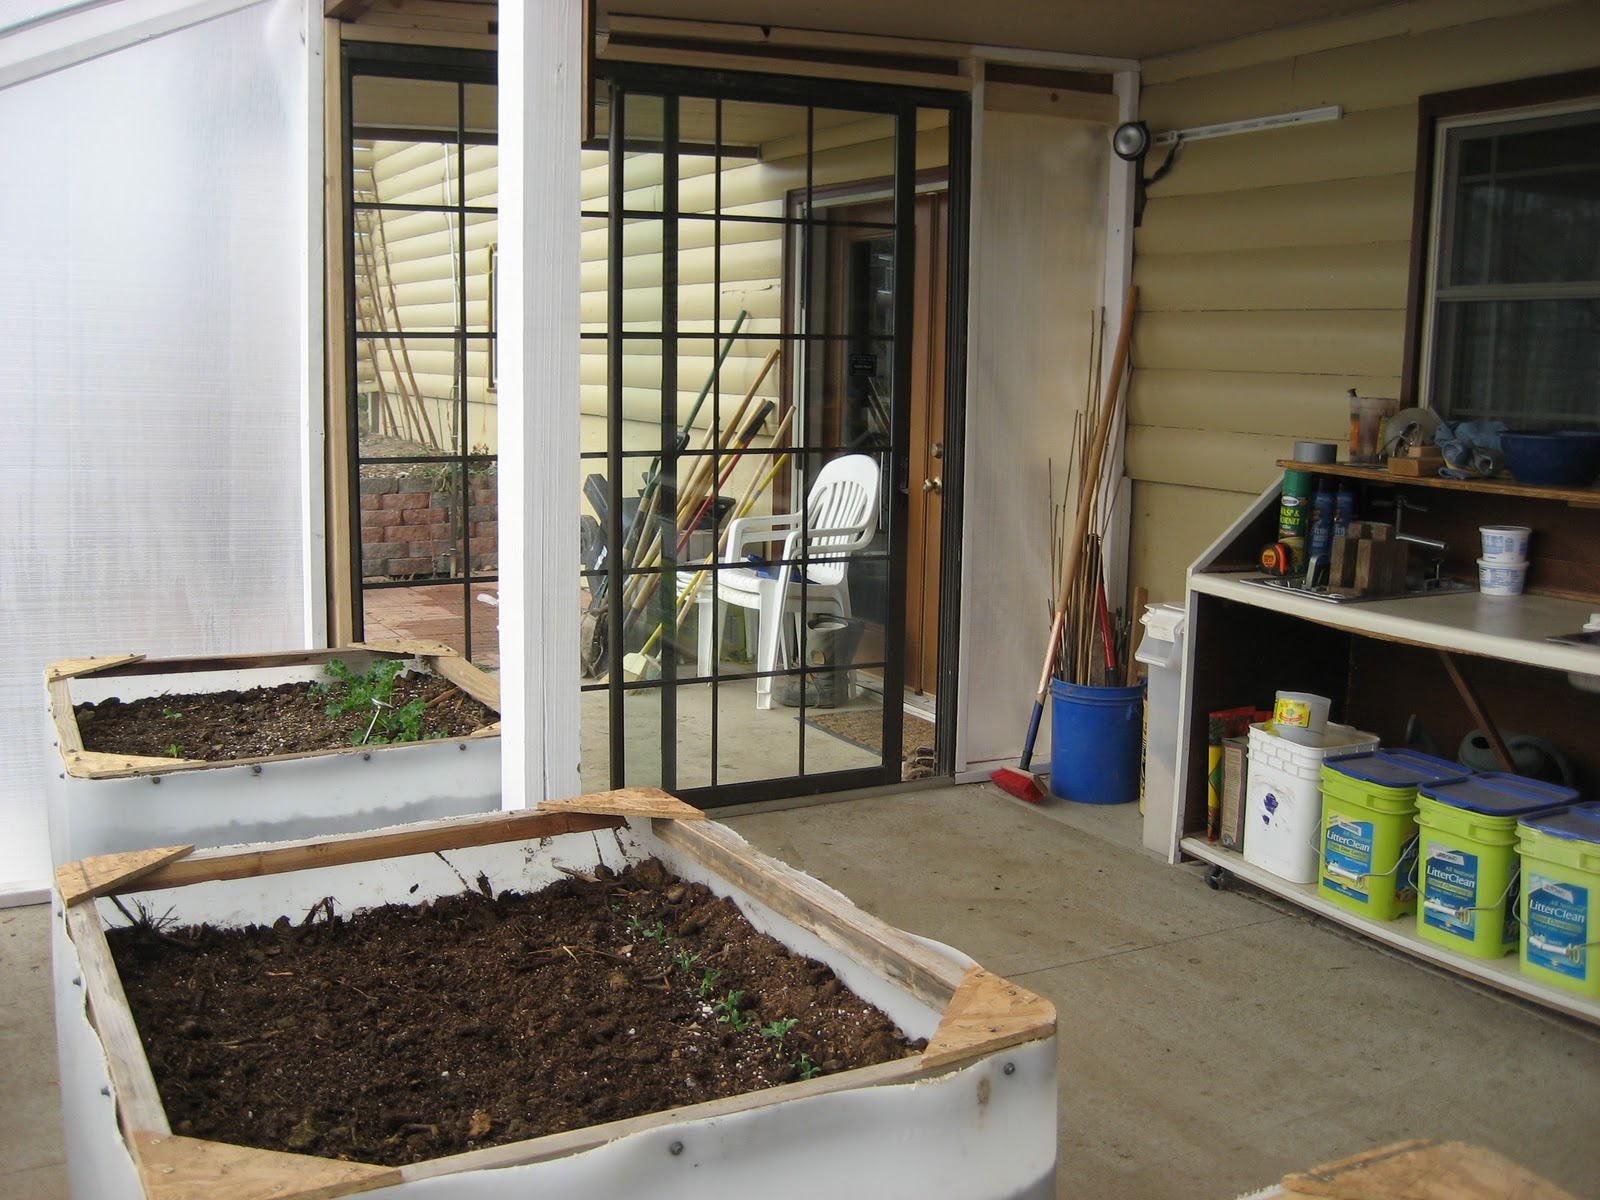
We had a few challenges, such as the bins we are using as beds. We got some 350 gallon food-grade containers, cut them in half and put them on dollies so we can move them around a bit. The weight of the soil in them made them each sag toward one side, so we had to support them better on the bottom with plywood. This took extra time re-doing them before planting. These had been used for barbeque sauce. Even after cleaning, we still get an occasional whiff of the barbeque sauce. Our veggies just may be pre-sauced!
We also had some challenges determining what kind of soil to use. Some references suggested only using purchased potting soil, which we didn’t want to do. It would be a LOT of potting soil to buy. We winged it with a mixture of plain Colorado soil at the bottom, gradually mixing in some soil we dug out from one of our raised beds (well amended) complete with lots of earthworms, some peat and perlite and homemade compost. There’s a higher percentage of perlite and compost near the top of each bin. Hopefully this’ll do the trick.
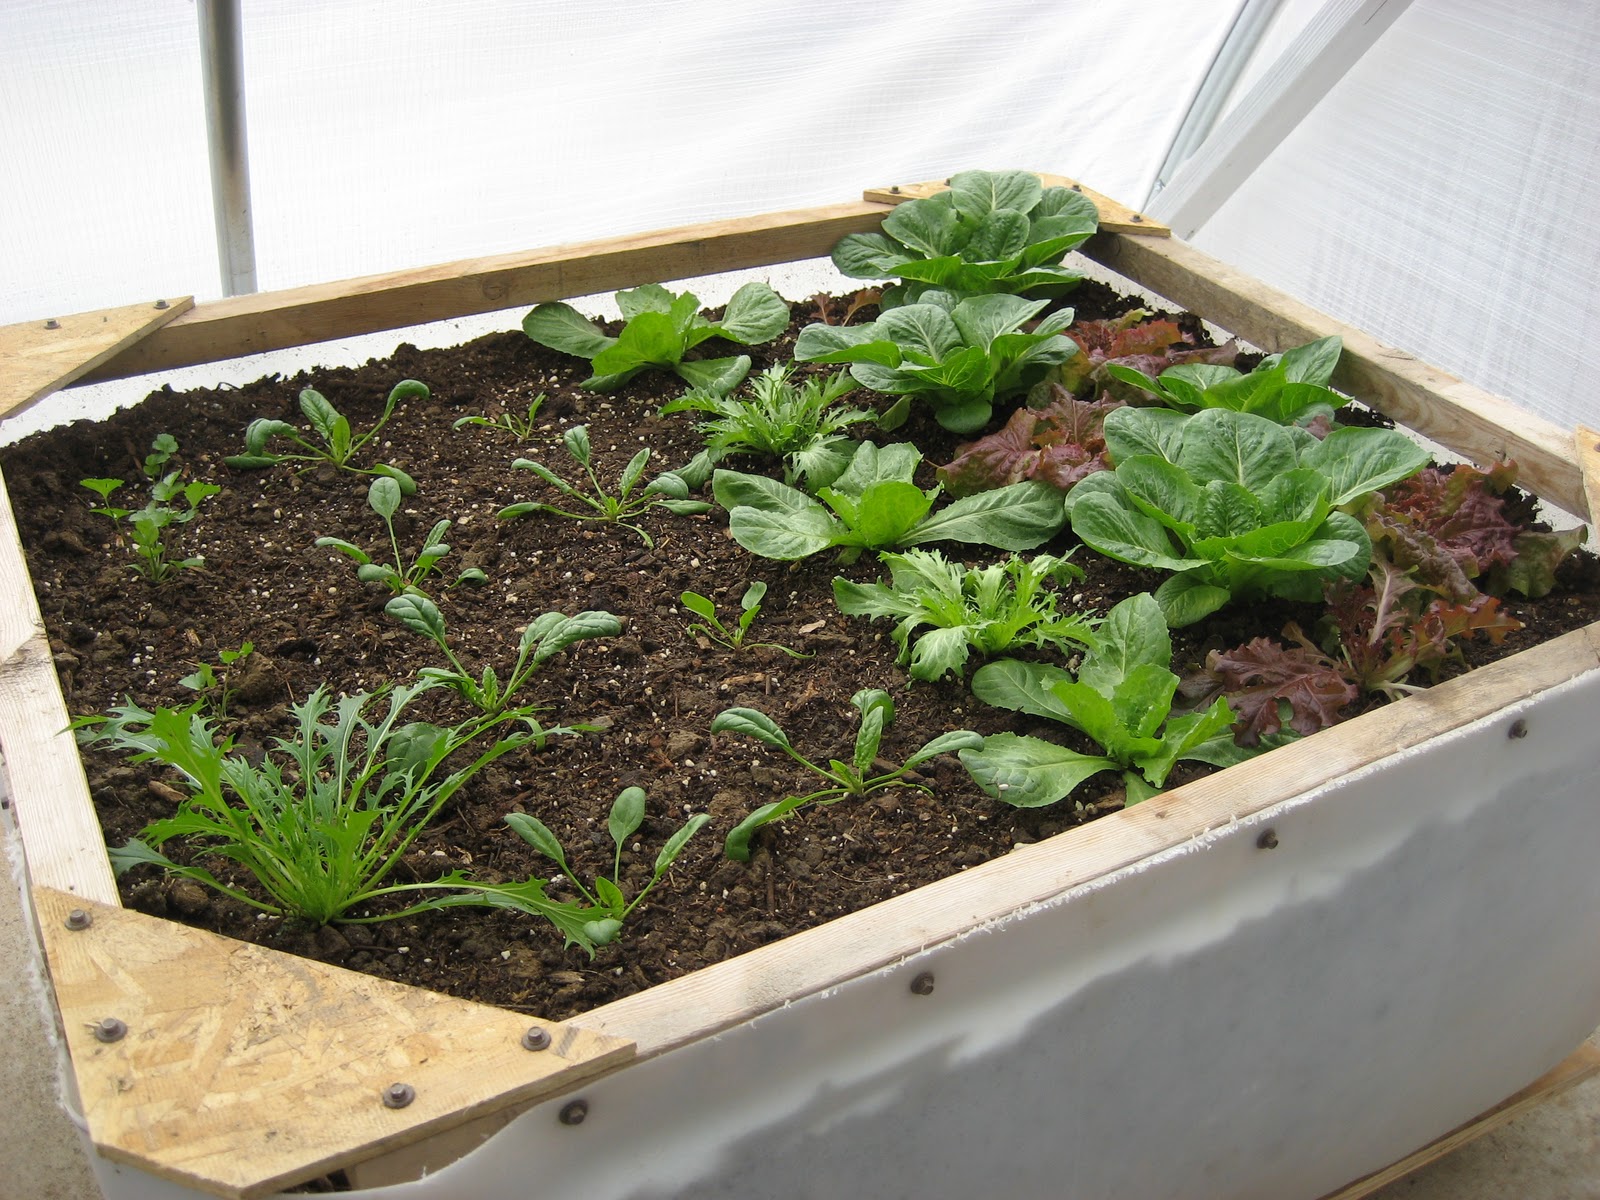 |
| Bin with salad greens |
I started most things in the house previously, under grow lights. I wish I’d started more things sooner, but now I’ll know better what I should start and when I should start them. I’ve planted salad greens (lettuce, spinach, endive, mizuna), cilantro, beets, kohlrabi, leeks, scallions, garlic, swiss chard, kale, peas, napa cabbage, rutabagas and a few carrots. All of these things should do well in cooler weather.
Yesterday afternoon it was 80 degrees in there, while about 50-60 outside. The
 |
| 6 bins for planting |
humidity inside is running around 50-60%, much more humid than outside most of the time. This morning it was about 20 degrees outside, and over 40 in the greenhouse. The soil temperature has been running around 60 degrees.
My potting bench & work area is neatly against the wall, and this is also where we keep the duck feed and get it ready to take out. For the winter, we’re taking their water out each day in a bucket, since we can’t keep the well water hose out there in freezing temps.

As you can see, it’s a pretty dandy setup!
Greenhouse Construction Has Begun

Tim has begun to work on our greenhouse, which we will use for growing a few things in late fall/early winter, and then in late winter/early spring. We’ll also use it for hardening off seedlings before planting them outside. It faces the south, so gets plenty of light and warmth in the afternoons.
We’re making lots of plans, reading books and finding websites with greenhouse information. I’ve begun starting a few seedlings in the house, which will be planted in large planters in the greenhouse. Lettuce, spinach, endive, kale, beets, kohlrabi, some leeks and scallions are already started, and I’ll be getting some seeds for a few other cold-tolerant items. I’m also planting some of these things in the cold frame. I expect the cold frame things to be used first, then move on to the things that will be in the greenhouse. Then I’ll start another cold frame in the spring. I’m still starting the seedlings in the house under lights, as I have good success with that method using the soil blocks.
Meanwhile, it’s getting pretty cold overnight, so I’m harvesting what I need to before it’s too late. I picked off all near-ripe tomatoes and gave them to a friend on Friday, cut off all basil near the root, washed it up last night and will dry/freeze/make pesto today. The peppers are under the cold frame, and hopefully some of what’s there will still ripen. I will probably pick green tomatoes, too, and do something with those. I need to dig up potatoes one of these days, and discover how well they did. I’m particularly anxious to see if the sweet potatoes grew! I’m not sure our season is long enough for them, and I got them started later than I’d hoped. The slips I started in the house took longer to sprout than expected.