GrowVeg Garden Plan for 2021

2021 GARDEN & GREENHOUSE PLANNING

It’s the end of February, and despite the winter cold, the garden is not far from my mind. The greenhouse has been keeping us supplied with veggies all winter, in addition to what was stored from the 2020 summer garden outdoors. 

OUTDOOR GARDEN
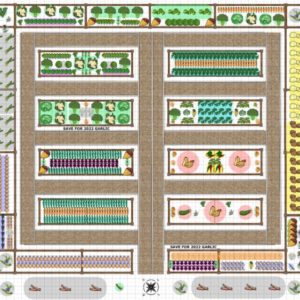
GrowVeg Garden Plan for 2021

My GrowVeg Garden Planner is complete for summer 2021. Some changes are likely to be made, but the plans are in motion, the seeds have been ordered and arrived, the calendar reminders have been set. A few seedlings have already been started.

I have been using this GrowVeg Garden Planner for many years both in my former garden and here in Guffey. GrowVeg has made some changes this year due to the end of Flash Player, and now it’s faster, easier to use, and they’ve made some great changes. I was able to be a beta tester for this new planner, and had a lot of fun trying it out during the later planning stages.

As always, I’ve rotated my crops as much as possible and have planned in advance which beds will be started earlier and which will be later, as well as which will be saved for my 2022 Garlic. This year I will try a few new varieties of veggies I’ve grown before, but no new veggies. As usual, I’m keeping the things that need to be covered the most in the interior beds, as these are the easiest to cover with plastic over the hoops. The perimeter beds are primarily garlic, onions, potatoes, beets & parsnips. The horizontal perimeter beds across the top of the plan receive the most sun in the fall when it is lower in the sky, so I’m planning the crops to be harvested last in that area: my second planting of broccoli, cabbage, cauliflower, brussels sprouts, some spinach, lettuce and carrots. All of these can be harvested after a few light frosts, and the sun will help them warm up to grow as long as possible. 

Tim & I are planning better ways to cover the perimeter beds with frost cloth for those first few weeks when there will likely be frost and a snowstorm or two. Our old frostcloth has gotten rather ratty & mouse-eaten, so we purchased enough new frostcloth to cover just about all the beds. This is in addition to the plastic we use to cover the most susceptible plants in the interior areas.

Hopefully this year we will not have the problems with the mice and pack rats as we did last year. The bait traps Tim had put out really seemed to keep them under control the later part of the summer. By having them in place throughout the winter & spring, we hope to prevent all damage to the garden. We may make a few changes to the way we protect things from the spring cold & snow with better supports for frost cloth and/or plastic, and make it easier to put them out at night and remove them in the morning.

GREENHOUSE
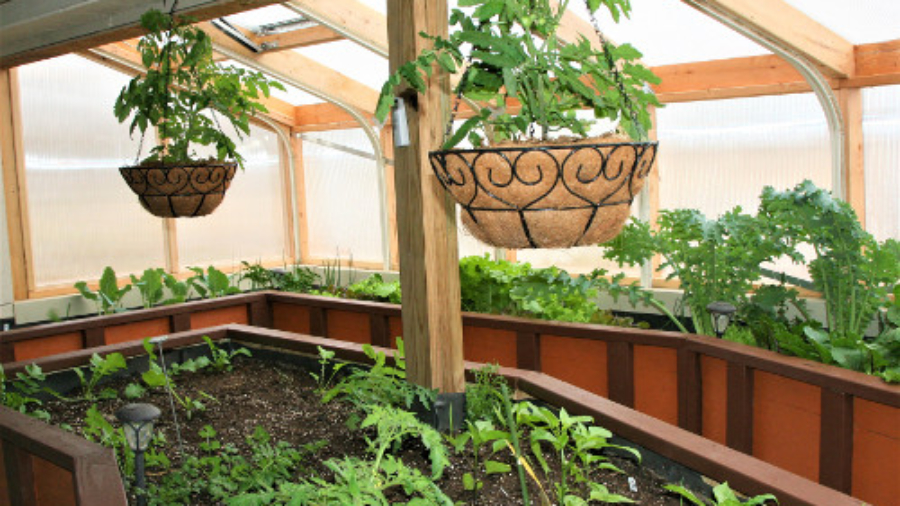
The greenhouse has been growing great! In the fall I planted some broccoli, cauliflower, cabbage, lettuce, tomatoes & zucchini. We’ve really enjoyed eating these fresh from the greenhouse. A couple of my tomatoes have produced the best tomatoes I’ve ever grown in the greenhouse. The Oregon Spring & Siletz tomatoes have been big, meaty, juicy, with few seeds and easy to peel when I don’t want the skins. Since I’ve had such an abundance, I’ve frequently used them for any recipe that uses diced tomatoes or tomato sauce. I think they liked the location (or I did a better job of keeping them fertilized!).
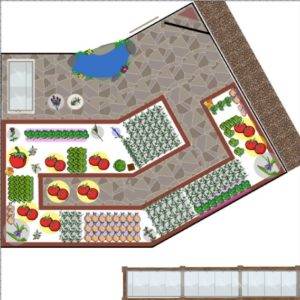
Greenhouse Plan for February 2021

I’ve used the Garden Planner extensively for the greenhouse as well. The “In-Ground Dates” feature in the planner is especially helpful. The photo at the right shows the greenhouse plan for the end of February. With the Planner I am able to show specific plants for each month of the year. Since my greenhouse is used constantly, taking out old plants and replacing the spot with new ones, this really helps me keep track of things and plan ahead. I’m able to start seedlings on my grow bench under lights, preparing them to go in where something else will be removed. At the bottom I’ve added our three cold frames, which may be planted in March with lettuces, spinach, and perhaps some onions to transplant later to the garden.

GREENHOUSE COVER CROPS
This year I’ve felt like I may have been overworking the soil in the greenhouse. Even though I typically refresh the soil by adding compost, vermicompost, aged manure & fertilizers each time something is planted, I fear that is not enough. Without going to the trouble of allowing a long rest period or removing all the soil and replacing it, I’m experimenting with planting some cover crops, some of which are shown in this February plan. I tilled in some well-aged horse manure or some fairly fresh duck manure and a bit of vermicompost, then scattered seeds of mustards, cowpeas, buckwheat & daikon radish. I’m giving them a chance to sprout & grow a bit, then tilling them in. In some cases, I’ve planted pretty soon after tilling these in, but in some of the larger areas I’m experimenting with solarizing the soil by covering the area with clear plastic. The solarizing should heat up the soil and kill diseases which could be in the soil. Hopefully this will only take 2-3 months and should help recondition my tired soil. There should be an update later on how well this goes, but I won’t have actual “data” and will only know by how well the plants grow. As it is said, “Only time will tell.”

040918_1524_ORGANIZATIO3.png

ORGANIZATION, PLANNING & RECORD KEEPING

I’m kind of a nut when it comes to organization and planning, and it may border on overkill. Sometimes I think I may spend more time with this than I do in the garden. I do most of this organization work during the winter when I have the extra time on my hands. When garden time comes, all I need to do is minor updates & notes. My methods for organizing and planning are not specific to high-altitude gardening, but are extra helpful when planning a garden that only grows in a short season, or for making full use of limited space in the greenhouse year-round.

SEED SELECTION

When I begin the process of seed selection for the year, I begin an Excel spreadsheet. Mine looks something like this. I start this process in January, and get seeds ordered in February, before the varieties I’ve chosen are no longer available (which has happened before).

I begin by deciding what types of plants I plan to grow, and make a list. The first 3 columns show whether I will grow them in the greenhouse, the cold frame or the outside garden. Then I begin looking at various websites and books that I have, to determine what varieties I might like. I add notes about whether they are organic, how many days to harvest, the vendor, price and miscellaneous notes about the varieties. I start with a BIG list, then begin to delete those I decide not to order. Eventually my list looks something like the one above, which I can sort by vendor, then go to that website and use this as my order list. The varieties with blank spaces indicate seeds I already have on hand.

KEEPING NOTES

After this, I have plenty of time to add information about all these seeds to my notebooks, and to look up information regarding when to plant the seeds, whether to start them indoors or in the garden, etc.

For this process, I use Microsoft One Note. I prefer the Microsoft Office desktop version, but it is also available as a free app, available for Windows or Apple operating systems, or online with any browser. I use this extensively for all my garden planning and note-taking.

These are the main sections (Tabs) I use:

  • PLANNING: links to websites I refer to, companion planting information, seed companies, etc.
  • BEDS: information about what treatments have been given to each bed in my garden
  • GREENHOUSE: general planning information for the greenhouse
  • HI-ALTITUDE: various information about high-altitude gardening, my weather and frost date information, best types of vegetables for high-altitude, etc.
  • FUTURE: ideas to explore in the future
  • NATURE: I keep logs of when I view various birds, squirrels, deer, elk, antelope, various wildflowers, etc.
  • PESTS: pests I see, what I do about them, information about pest control
  • SOIL & AMENDMENTS: information about fertilizers, soil amendments, etc.
  • PLANTS: This is a group section with sub-sections including: Alliums, Beans, Beets, Brassicas, Carrots….you get the idea.
    • Each of these sections contain pages of what I’m planting, including all the varieties I’m planting, dates started, transplanted, harvested, days to harvest, notes about how they did, etc. I also include growing information here.

Here’s a look at my “Brassica” section (under the “PLANTS” group) as an example, showing the page of 2017 Greenhouse Brassicas:

This year I’ve made a separate One Note Notebook, I call “Guffey Veggies”. I used to keep all this information in one notebook, but it got too full of stuff and hard to organize. Now I’m using this “Guffey Veggies” notebook to keep notes on all the seeds I choose. Since I order most of my seeds online, it’s easy to copy and paste this information into the notebook for future reference. Those pages look something like this:

PLANNING & PLANTING

One more thing I did this year was to create a spreadsheet to help me know when to start each vegetable for the greenhouse, the cold frame and the outside garden. It looks like this:

Let me explain this!

  • WHERE: Greenhouse, Cold Frame, or Outside
  • SPECIES, VARIETY: vegetable to plant
  • DAYS: Days to maturity
  • HOW: whether I will start this inside in soil blocks, or direct-sow outside
  • START: the day I will start the seeds. This is automatically calculated from the columns that show when I plan to transplant out, and the number of weeks/days the plant will remain inside before planting.
  • WEEKS INSIDE, DAYS TO TRANSPLANT: weeks, days from sowing to transplanting out.
  • TRANSPLANT OR START OUTSIDE: gathered from growing information I’ve collected
  • OUT ETA: The date I plan to transplant or sow outside
  • HARVEST ETA: This is the date transplanted out + the number of days to harvest.
  • 2018 ACTUAL HARVEST: to be filled in as the summer progresses

This spreadsheet can be sorted as desired: by coldframe, greenhouse, outside, by start date, etc. Right now I’m finding it most handy to sort by start date, so I know what I need to be doing in the coming weeks. As you can see, I’m planning to plant outside in the coldframe sometime around May 15. This will depend on the weather—some things may go out sooner or later than the 15th.

Hopefully all of this is helpful to anyone reading. Everyone has their own way of doing things, and others may do just fine without all this time-consuming organization. If you just “wing it” you may be just as successful, but I find it helpful to do all of this and keep track of what I’m doing so I can go back the next year to determine what worked and what didn’t.

For instance, last year I started my fall plantings of beets, cabbages, broccoli and a few other things too late. They just didn’t have time to grow before fall. I also found that starting most things in the ground last year wasn’t successful. I am glad to have all of these dates & information written down from last year. This year I will start almost everything indoors and plan to transplant them out after they’ve sprouted and gained a little growth. (I will still start carrots & peas outside, but that’s about it.) I know that in my cool weather, the harvest dates for almost everything will be later than expected, but I used the published “Date to Harvest” anyway. I will compare this with my actual harvest dates.

greenhouse500x333

GROWING FOOD IN THE GREENHOUSE

GROWING FOOD IN THE GREENHOUSE


November 7, 2019

The greenhouse at Good News Ranch has kept us supplied with year-round vegetables since 2017.  During our winters the greenhouse provides us with lettuce, spinach, chard, bok choy, broccoli, cauliflower, cabbage and zucchini. We enjoy fresh tomatoes year-round from the greenhouse. I’ve also occasionally harvested turnips, rutabagas, beets, daikon radish, kohlrabi, & Chinese cabbage. Herbs growing are thyme, rosemary, cilantro and basil. Summers provide us with tomatoes, peppers, cucumbers and sometimes winter squash all in the greenhouse, while everything else is grown in the outdoor garden. Please see the blog post, “Garden Planning & Implementation” to read more about our greenhouse construction.

GREENHOUSE SOIL

4/7 Cover Crop Growth

Our greenhouse beds are raised atop a concrete floor, and reach about 28″ in height. The soil we created at first (2017) was a combination of compost (we purchased from a garden center), manure, peat moss, leaves and perlite. Since then it has matured from the addition of vermicompost & its worms, various nutrients & fertilizers, & garden compost.  Each time plants are removed and new ones replace them, the area is refreshed with garden compost, vermicompost & fertilizers.

Since our greenhouse is used year-round, we have quite a turnover of plants! (See “Planning” below.) In order to refresh the soil, we occasionally will grow a cover crop in these beds. I call them “baby covers” since they only grow to about 3-4″ tall before they are tilled into the soil. See the “Cover Crops” page for more details.

GREENHOUSE WARMTH

POND-Holds 200 gals water

For the month of January 2018, the greenhouse temperatures averaged 74°F during the day, and 56°F overnight. (The outdoor temps ranged from -9 to +62, averaging 11 at night and 48 during the day that month.) At first, we had been installing insulation over the glazing each night to retain the heat that had been collected during the day, but decided that was unnecessary. Now, we only do this when it is extremely cold. The floor and soil in the beds are heated from the sun during the day, and the soil stays at about 65-70°F. The pond (shown at left) is filled with water to act as mass thermal storage. We are now using a radiator heating unit that draws its heat from the water heated by our solar collector. We have a small, on-demand propane water heater which heats the water when the sun doesn’t shine and the solar collector storage tank has run out of hot water. These are all automated to turn on and off as needed.

GREENHOUSE PLANNING

A lot of planning goes into the Greenhouse. I’m continually planting & replanting & letting small areas rest between plantings. I’ve learned to plan ahead by guessing how long plants will be in their spots, then starting new seedlings under grow lights so they’ll be ready to go in shortly after the previous plant has been removed. During the summer I don’t use the entire space, so I can use some of that greenhouse space for potted plants that can’t stay outside when it’s too cold. I use the GrowVeg Garden Planner with its month-to-month feature to rotate the plants on my Greenhouse chart.

WHAT GROWS IN THE GREENHOUSE?

November 7, 2019

WINTER: After several years, I’ve learned a few things about how things grow and when and where I should plant things in the future. I’d had high expectations that things would grow like they do outside, since the optimum warmth would be kept high. However, without the addition of an artificial light source, the plants receive fewer hours of light per day during the winter months. They grow much more slowly than they do in summer outside! As the spring days gradually getting longer, the plants grow faster. Some things do better than others: the cold-season crops such as kale, chard, spinach and lettuces have done well during the winter. The tomatoes are quite productive, but the tomatoes are smaller and ripen much more slowly than in summer months. Since our greenhouse is not as tall as stand-alone greenhouses typically will be, I can’t plant tall things. I’ve learned to stay with “compact” varieties of all plants, especially tomatoes. The only exception to that is I usually plant one or two indeterminate tomatoes that can be trained along the beam above.

SUMMER: In summer months the greenhouse is used primarily for tomatoes, peppers, cucumbers & occasionally a winter squash or two (smaller, compact varieties). The tomatoes & pepper do not do well outside here and are reserved for greenhouse growing. I try to keep the tomatoes in the bed that’s farthest from the front windows, as it can be quite hot in those front beds, even for tomatoes. Since the winter squash can be started much earlier in the greenhouse than it can outdoors, I’m often able to use the male flowers from the greenhouse to hand-pollinate the outdoor squash. Since natural pollinators are few in the mountains, I depend on hand-pollinating the squash. 

When planting the beds by the windows, I had planted some of the larger things, such as kale and swiss chard, at the back of the beds, thinking that the shorter plants in front should be more accessible to me, but I wasn’t thinking about the larger plants by the windows shading the plants closer to the inside edge. Although the shorter plants may be harder to get at, they should have been planted closer to the windows behind the taller plants from the perspective of where I stand to work. 

Vertical Zucchini

I’d read that growing zucchini vertically is a space saver, and a good way to grow it in a greenhouse. I tried that, and I’m glad I did. Rather than having the plant sprawl across the bed, it is growing nicely upward, saving space around it for other things. The zucchinis are easy to see and easy to pick. 

With the year-round greenhouse, I have little need to do canning! I used to plant LOTS of tomatoes and spent the late summer months in the kitchen with dozens of canning projects. Now that I have year-round tomatoes, I rarely do canning, unless I have an over-abundance of tomatoes all at the same time. I’ll occasionally make just a couple of my favorite recipes, such as sweet chile sauce. Additionally, I used to grow extras of things like broccoli or cauliflower for freezing or cabbage for sauerkraut during the summer months, but I no longer do that: I can enjoy it fresh all year. I reserve the outdoor garden for the things that cannot be grown in the greenhouse or just do better outside.

GREENHOUSE PESTS

The greenhouse suffers from two pests: aphids & pill bugs. I do my best to control them but they keep returning. 

APHIDS: For aphids I spray with neem. This seems to work the best. The aphids are especially bad on peppers, and make me not want to grow peppers in the greenhouse again.

PILL BUGS: These don’t do too much damage to the larger plants, but they often eat small seedlings until there’s nothing left. They really like the brassicas, spinach and young tomatoes, and pretty much leave the lettuce alone. I’ve begun putting collars of cut bottles or cans around the seedlings until they are big enough to withstand a little damage. In some cases the collars stay around the stem for the life of the plant. Gallon vinegar bottles cut into 2″ collars work well for this.

Building the Garden

APRIL 2017 GARDEN PREPARATION

It’s springtime, and although there is certainly more snow to come, the garden process has begun! Tim is busy clearing the area where we will have our raised-bed fenced garden, and Laurie is busy planning and starting seedlings indoors, under grow lights. It’s a big, exciting year for us, and we look forward to planting, tending & harvesting!


FIRST THINGS FIRST

For the past couple of months, I (Laurie) have been planning what to grow, where to put it, and when to start each plant. For the past few years I have been using the Garden Planner found on GrowVeg.com, which has been a handy tool for planning where I will put each plant each year. After several revisions, our garden plot will look something like this. Some beds will remain empty until mid-summer when we will plant for fall. One of the beds will be filled with cover crop plants, some of which will go to the compost pile. We’re going to call this a “learning year” and try not to go overboard. 🙂

RAISED BEDS

The raised beds will be about 26-28” tall, . Because we need to fence out deer, rabbits, and other roaming critters, the garden will include an additional 4-6′ of fencing starting at the top edge of the perimeter bed and extending upward. Since the garden will be filled with the high, raised beds, we don’t feel we need a terribly tall fence, as the deer won’t want to jump over into a place with such unsure footing.

Richardson’s Ground Squirrel

Each bed will be lined at the bottom with a layer of rocks and gravel (which we have a lot of here in these “rocky” mountains). We believe that this will not only provide some good drainage under the soil, but should also keep these prolific ground squirrels from burrowing up into the beds. They are everywhere around here: digging, burrowing, running across the roads. Some folks call them “picket pens” or “pocket gophers”, we just call them squirrels. We have observed that the squirrels are absent from the area behind our house where there is a lot of this rocky/gravelly stuff, and our assumption is that it’s just too heavy and thick for them to get through. At least, we haven’t seen evidence of them burrowing through it. Our second line of defense against these guys will be a layer of stucco netting, which is a LOT cheaper than the hardware cloth which is often recommended as protection from ground squirrels. Any long roots should still be able to penetrate both the stucco netting and the rocky bottom. Additionally, just to the inside of the perimeter beds, there will be a layer of plastic lining the walkway, to keep both the weeds and the squirrels out.

GARDEN SITE PREP

This is a shot of the garden site, the morning of April 19, 2017. Although we have 40 acres, most of which is pretty flat with no trees, we are placing the garden here, in a protected spot from wind, and where plants may get a little shade in the afternoons. The area gets full sun from the E-SE all morning into early afternoon. We feel this site will be best, to protect them from the full effect of the intense sun at our elevation. It is also relatively close to the water hydrant. Tim has begun clearing the area and is building the raised beds. The garden itself will be 41 x 35 feet in size, a little over 1400 square feet. The actual planting bed space will be 740 square feet. There is some slope on this site, so it will be terraced a bit along that slope. The entrance to the garden will be wide enough for the tractor to fit through, which has been and will continue to be a big help. The beds will be filled with a soil combination of natural soil, well-aged horse manure, used duck bedding, some additional organic matter and compost.

LET THERE BE LIGHT

In addition to planning the physical garden, Tim has put together a potting bench area and grow lights under the house in our crawl space. It’s not real pretty down there, but functional. The sink and potting area are helpful for me to mix and prepare the soil blocks I use to start seedlings. Under these lights, I already have started several things; mostly greens for the cold frame section which will be planted mid-May, onions and a few other things which take a long time to get started. The lights can be raised as the plants grow. If necessary, we have more lights that can be placed on the lower side of this bench.  (See more about my soil block approach HERE. Soil blocking supplies can be found at GrowOrganic.com or JohnnySeeds.com.)

WEATHER CONSIDERATIONS

Our official “Last Frost Date” is about June 9. The closest listing is for an area about 500 feet lower and 20 miles away, as the birds fly. Our frost date may be a bit later. In the past couple of years our June lows ranged from 33°F (June 14th) to 50°F. Our USDA Plant Hardiness Zone is officially 5a, but I don’t believe it. Most locals say that we are at least in the Zone 4 range, and some suggest not planting anything that can’t survive Zone 3. I’m generally considering we are Zone 4, and that if I want to try warmer season plants, they will need considerable care and protection from the cold. Our highest low temperature the past couple of summers was 50 degrees, and only for a couple of days each summer. Yes, I will try to grow tomatoes! They will be covered EVERY NIGHT and will be surrounded with jugs of water to keep them cozy and bricks around the base for added soil warmth. Almost all the beds will have the ability to be covered, and anything that requires more warmth will be covered most nights. It also hails here, so I will be prepared to provide cover leafy plants from those icy pellets which are sure to descend.

VEGGIE VARIETIES

This year I will be planting several things, to see what will grow and what won’t. I’m even planning to try things that may not make it, just to see what happens. I’m sure that cool-season vegetables shouldn’t have a problem. It’s the warm season ones and those that need a longer season that are in question. By starting things indoors ahead of last frost and protecting them against the elements, I am hopeful for success!

Rhubarb Spring Growth

Here’s my list: alliums (a variety), beans (bush & pole), beets, brassicas (kale, mustard, cauliflower for now), carrots, herbs (annuals & perennials), corn (a cold-hardy short-season variety), greens (including arugula, lettuces, endive, radicchio, spinach, swiss chard), peas, peppers, rutabagas, squash, tomatoes, asparagus, raspberries, goji berries, and finally, rhubarb, which has been in the ground since late 2014 or early 2015. Later on I may provide a list of the specific varieties I’ve chosen.


IMG_5210

THE GARDEN SITE

We’ve begun planning for our new garden, which should be well in place and ready to go in Spring and Summer 2017. We have been reading up on high-altitude gardening, looking for information about what to grow, where to grow it, when to start and how to do it. We want to know what to plan on and what to be prepared for.

South side of the house

Conventional thought suggests that gardens should be on the south side of the house in full sun. That’s what all the books & websites will tell you, right? So, this is where it was going to be–beds primarily in front of the house (facing south) and terraced down on the left (west) side of the house. The greenhouse is planned to be in front of the deck on a southeast section.

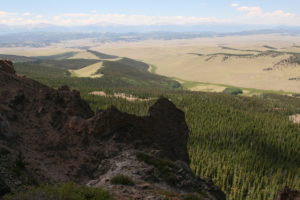
Looking West from Black Mountain shows northern slopes lush and south-facing slopes bare.

However, after observing what the summer conditions have been like our first two summers here, and reading of some of the challenges faced by other Colorado Rocky Mountain gardeners, we’ve changed our opinion and won’t be putting the garden directly on that south facing slope. We also have observed that on most of the slopes around here, the south facing sides are often quite barren of trees and vegetation, while the northern facing slopes are lush and green. The photo on the right shows several north-facing slopes full of vegetation and little on the south sides. Shouldn’t we pay attention to that? 

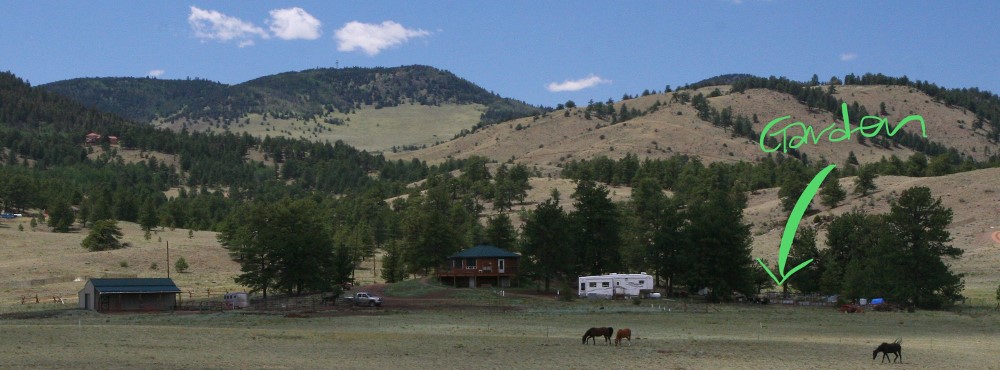
We have decided to place the garden northeast of the house with some trees around to provide afternoon shade. Although the summer temperatures don’t get incredibly high (85 is a rare, hot day here) the intense sun bakes the vegetation, and it has less of a chance to survive. Also, when the winds pick up it dries out the soil quickly, and would do so in front of our house where it is so exposed. At the east it will be a bit protected from the brunt of the wind.

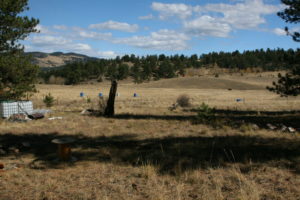
Here’s where the garden will go. This photo was taken on an October afternoon, so there won’t be as much shade in the summer as there is in the photo, when the sun will be higher in the sky. Our garden will get full morning sun and filtered light in the late afternoon. Things that require the most sun will be in the sunniest spots, as much as possible, keeping crop rotation in mind.

This garden won’t be nearly as large as our previous garden, probably less than half that size. (That garden was about 24 beds, about 1400 square feet of planted surface.) We’ll grow a lot of cool season vegetables, and as many short-season varieties of summer vegetables as we feel we can, including some tomatoes. We’ll have to be especially careful to cover the tomatoes nightly, as they’ll need all the warmth they can get. We will be making hoop covers to guard against frost as well as shade/hail covers to guard against the intense sun and occasional hail. Of course, we will have a 7-8 foot fence surrounding the entire garden, lest the deer get into an all-you-can-eat buffet.

I’ve been gathering weather statistics from our weather station the past two summers. Here are my stats for July-August, 2015 & 2016.
The morning “lows” ranged from 34-51F. 
The afternoon “highs” ranged from 52-92F.
In those two years, there were only 7 days with lows of 50 or more. In those same years there were 6 days with highs of 90 and up–all of those were 2016; in 2015 there were none. The average all-day temperature for the summer months has been 59-64F. So, as you can see, many of the plants will require frequent covering, to prevent being too cold in the morning and too hot in the afternoon.

It’s fun to get into gardening mode again. Now that the garden site has been chosen, we have lots of designing and planning to do, and the work will be rewarding.